Note: Please read this guide carefully before you begin. If you have any questions, contact us before applying the skin—once it’s applied, it might be too late to fix any issues.
- Updated Backing Paper
We’ve improved the backing paper for easier removal of the Slate Skin. Please note, this differs from what’s shown in the video. The new backing paper has two distinct sides: a smooth, silicone-coated side and a regular paper side. Only the smooth, silicone-coated side should come into contact with the adhesive side of the Slate Skin. Contact with the rough paper side can cause serious damage, making the skin non-removable. - Test Fit First
We recommend placing the slate skin on your device (with the stone side facing down) to get a feel for how it should fit. Remember, once the skin is applied, returns cannot be accepted. - Clean Before Applying
Since the slate skin is made of real stone, small dust or stone particles may be present, especially after shipping. This is normal. Clean your device thoroughly before applying the skin, and blow away any particles from the Apple logo to avoid micro scratches. - Apple Logo Guard (Optional)
If you purchased the Apple Logo Guard Film, apply it before adding the slate skin and follow its specific instructions. - Specific MacBook Models
For the 14″/16″ MacBook Pro (2021–2024) and 13.6″/15″ MacBook Air (2022–2024) models, Apple has updated the design with harder, shorter edges. We’ve adjusted the skin to leave a 1.3mm (0.05 inch) edge around the curves for a perfect fit. Please see - Need Help?
If you’re unsure about any steps, please reach out to our team before applying the skin. It’s always better to clarify questions beforehand.
How to Remove Your Slate Skin
Note: All skins purchased from 2022 onwards can be easily removed without needing extra tools or heat. The instructions below apply to older versions only, which may require more care during removal.
Potential Burn-In or Residue Issues:
If you notice any “burn-in” effects, marks, or adhesive residue after removing an older skin, this can happen due to the stronger adhesive used in past versions. Follow the instructions below to safely address these issues.
Materials You’ll Need (for older versions):
- An old plastic card (like a credit card)
- Glass cleaner
- Acetone
- 1-2 microfiber cloths
Step-by-Step Removal (for older versions):
Start
Gently lift a corner of the skin using your fingernail or a plastic card. Avoid sharp objects to protect your MacBook.Apply Heat (optional)
If the skin is difficult to remove, warm the area slightly with a hairdryer to soften the adhesive, then peel it off slowly.Handling Burn-In Marks or Residue
If you notice any adhesive residue or burn-in marks, use a microfiber cloth with a small amount of acetone to gently clean the area. Be careful not to rub too hard to avoid damaging the surface of your device.
Important Notes:
Take your time and be patient to avoid damaging your MacBook. While newer skins leave no residue, older versions may leave minimal traces, which can be easily cleaned using the steps above.
Note: Please read this guide carefully before you begin. If you have any questions, contact us before applying the skin—once it’s applied, it might be too late to fix any issues.
Prepare Your iPhone
Before you begin, ensure your iPhone is clean. Use a microfiber cloth or a soft, lint-free cloth to remove any dust, fingerprints, and oils from the surface. This ensures better adhesion and a flawless finish.
Peeling the Skin
Gently peel the Real Slate Skin off from its backing paper. Handle the skin carefully, as it’s made from real stone. The backing paper has a glossy silicone side for easy removal.Aligning the Skin
Place the slate skin over your iPhone to align it with the camera and edges. Take your time to ensure the perfect placement. Once aligned, press the skin lightly into place, starting from the center and working outwards.Smoothing the Skin
Press down gently on the skin using your fingers to smooth it onto the surface. Ensure that there are no air bubbles or wrinkles as you work your way to the edges.Applying the Apple Logo Guard (Optional)
If you’ve purchased the Apple Logo Guard Film, apply it before placing the slate skin. Position it properly over the Apple logo, and once you’re satisfied with the placement, proceed with the rest of the skin application.Final Adjustments
Once the skin is fully applied, check all edges and corners to ensure it fits snugly. If needed, you can carefully peel and reposition it for a better fit.
Additional Tips:
- As the slate skin is made from real stone, small dust or stone particles may be present after shipping. If particles appear on the Apple logo or surface, gently blow them off to avoid scratches.
- Your iPhone is now beautifully protected by the real slate stone, giving it a unique, natural, and premium appearance.
Powerful yet gentle cleaner for real stone surfaces.
Alcohol-based formula removes dust, fingerprints and daily dirt effectively.
Antibacterial, fast-drying, streak-free.
How to use:
If necessary, wipe the stone surface lightly with water.
Use the pipette to place a few drops of Premium Stone Cleaner on a clean, lint-free cloth.
Wipe the stone surface evenly.
For best results, finish with a second dry microfiber cloth.
Safety advice:
– Contains alcohol – keep away from heat, sparks, and open flames.
– Keep out of reach of children.
– Avoid contact with eyes. In case of eye contact, rinse immediately with plenty of water.
– Do not ingest. If swallowed, seek medical advice.
– Wash hands after use.
– Store tightly closed, cool and dry, away from sunlight and frost.
Cleans and protects the plastic parts of your Roxxlyn case.
Dust-repellent, antistatic, with a lasting matte finish.
How to use:
Lightly clean the plastic frame of the case with water and let it dry.
Put a small amount of Case Care Liquid on a soft cloth.
Rub evenly into the plastic parts of the case.
Wipe off any excess with a second dry microfiber cloth.
Safety advice:
– Keep out of reach of children.
– Avoid contact with eyes. If contact occurs, rinse immediately with water.
– Wash hands after use.
– Do not apply to the stone surface.
– Store cool and dry, away from sunlight and frost.
Now that you own a Roxxlyn Real Slate Stone AirTag Case, this is the right way to use it smoothly and easily. Please follow this procedure over soft surfaces to avoid damage if the AirTag is dropped.
Please clean all surfaces of your AirTag. This will make things much easier and provide an even better result.
We also recommend using a small needle to carefully peel the stickers off the peel paper. Just lift one edge of the sticker carefully and the sticker will not be destroyed during removal.
The Apple AirTag has two sides, one has the metal side which also contains the Apple logo and engraved details of the airtag, let’s call this side “SILVER“. The white plastic side of the airtags we call “WHITE“.
First, apply the vinyl stickers to the exact center of the edge surface of your Airtag. One on each side. On the “SILVER” side of the AirTag, the sticker will overlap a little. This is perfect and is how it should be. For this side only, we recommend using a lighter to wrap the edges a bit for a perfect result. (A little gentle heat will do the trick).
Make sure you now place the airtag inside the case. Finally, remove the sticker with the real stone and place it in the exact cavity provided so that it looks just right.
That wasn’t so hard, was it? If you have any questions, you know how to reach us.
Instructions for the “Marble Fusion Stand for Apple Vision Pro”
Contents:
- 1 x Aluminum Chrome base plate with marble and technology (Bottom)
- 1 x Aluminum Chrome stand unit (Mid)
- 1 x Aluminum Chrome Apple Vision Pro holder (Top)
- 2 x small black self-adhesive wool felt points
- 1 x large black self-adhesive wool felt point
- 1 x black Inbus tool
- 2 x small Inbus screws
Note: Additional accessories are located at the bottom of the packaging. Please lift the foam insert to access them.
Assembly Instructions:
Preparation:
- Lay a clean cloth on a stable table to avoid scratches and provide a secure working surface.
Connecting the Base Plate and Stand Unit:
- Insert the stand unit (Mid) into the designated hole in the base plate (Bottom) until it clicks into place.
- Carefully tilt the unit sideways to access the lower hole.
- Use the Inbus tool to tighten the first Inbus screw.
- Stick the large wool felt point centered over the screw to cover it.
Uprighting the Base Plate and Stand Unit:
- Place the base plate with the stand unit upright.
Attaching the Apple Vision Pro Holder:
- Fit the Apple Vision Pro holder (Top) onto the stand unit.
- Tighten the second Inbus screw.
- Stick one of the small self-adhesive wool felt points over the screw to cover it.
Finally:
- Check that all parts are securely in place and properly assembled.
Enjoy your Marble Fusion Stand for Apple Vision Pro!
Included in the delivery (purchase option) are two Apple Logo Guard protective films to apply to your Apple logo (device).
Before you can start with the slate skin, the protective film for your Apple logo should be applied. Generally, it is recommended that you apply the logo guard film a few hours before the final application of the slate skin.
Once this is applied and you are happy with the results, the slate skin can be applied. Once this is done, the Apple logo protective film cannot be replaced. Therefore, the timing should be chosen wisely.
The protective film comes from the Orafol company from Germany and is mainly used in the automotive sector. We find that the properties are ideal for this purpose, as the film has some very unique features (see product description).
The protective film comes pre-cut on a liner, since the protective film is very thin, it is recommended that you use a simple needle to help you detach it. If the sides of the protective film bulge a bit unsightly, that is not a problem. It is important that the surface of the Apple logo is well and cleanly covered and that there are no bumps that the slate skin cannot compensate for later.
You can find detailed instructions on how to apply the film in Orafol’s application video, as well as in the instructions and data sheet. For sure its more complicated on a car but we are sure you get the idea and break it down on your small logo. Any questions we are right at your fingertips.
Video
German
English
So you now own a Roxxlyn iPhone Case, this is the right way to use it smoothly and simply. Please follow this procedure above soft surfaces to avoid damage if the phone is dropped.
Simply place your phone inside the case. this is a one-piece case and it will just fit perfectly.
It wasn’t too hard, was it ?If you have any questions, you know how to reach us.
Now that you have a Roxxlyn Real Slate Stone Skin for your new iMac, this is the right way to use it smoothly and easily. Please read the following steps carefully in advance, if you have any questions please contact our support directly at support@roxxlyn.com to clarify possible issues before applying as it might be too late afterwards.
Now unplug your iMac from power and disconnect all other connectors on the device. We recommend at least 15 minutes of rest for your device before you can finally start.
Please take a solid and stable surface, a desk, dining table or similar, important that you now put a soft cloth as a base on your desk, big enough for the iMac. This will protect your screen during the application. Important, no dust particles or any other particles in this cloth.
Please clean all surfaces especially the back of your iMac. This will make things much easier and ensure an even better result.
Now place the iMac with the display side down on the cloth. In front of you, you can now see the back of your iMac. The iMac is now in a horizontal position.
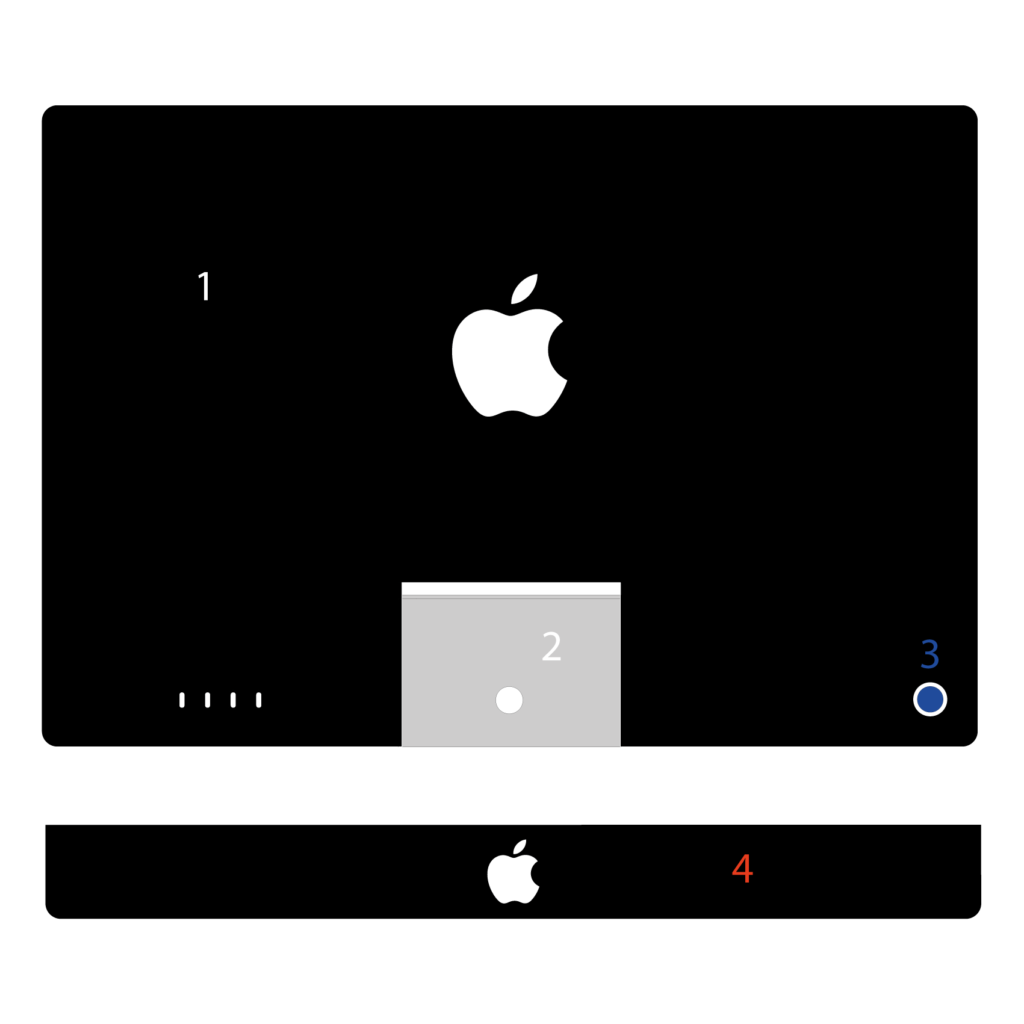
Next to you you now have the slate skin, this is applied on two pieces silicone liner, as soon as you remove this the adhesive starts to develop its power, so be careful. This real stone sticker consists of 3 up to 4 parts, if should you also have purchased the front cover.
TIP: You can also use both silicone liners if needed at any time, important use the smooth side for the adhesive side of the real stone sticker otherwise your skin will be damaged.
1 – Is the main surface, about 97% of the total area.
2 – is for the lower middle part, here is your power cable later on
3 – is meant to cover the on/off switch of your iMac
 TIP: Just as reference as we dont have a video tutorial for the iMac yet, but basically pretty similiar just the silicon liner is different.
Tip: If needed. Some heat like sun rays or a hair dryer will make the skin a bit more flexible. You can expose it briefly to the sun before attaching it.
Now take the big sticker (1) and stick it on the back of your iMac. Please press the stone surface to your iMac only when you have the desired position on your iMac. With this piece it is recommended to do the alignment with two people. If it still does not quite fit, you can carefully push and pull the stone or carefully remove it completely. Important carefully otherwise unsightly stretch marks arise. This double adhesive is a very special developed one which will leave zero glue when removing.
Please proceed and add sticker part (2) and then part (3) – finally (4)if purchased.
It wasn’t too hard, was it ?If you have any questions, you know how to reach us.
Roxxlyn Stone Care Essentials – Instructions for Use
Maintain and protect the natural beauty of real marble and granite with the Roxxlyn Stone Care Essentials Set. Whether used on accessories, decorative objects, or surfaces, this care routine helps preserve the elegant look and feel of polished stone over time.
Included in Your Set
1. Premium Marble Liquid Polish
A white-colored liquid polish designed to refresh and restore real stone surfaces. Ideal for reducing fine scratches, dull spots, and signs of daily wear. It enhances the natural shine and protects against dirt and moisture—without streaking or reducing gloss.
2. Optional: Gel-Based Marble Polish
A richer, gel-textured polish formulated for more intensive care. Perfect for smoothing light scratches and restoring deeper shine. It offers stronger protection and is recommended for occasional use when the surface needs extra attention beyond the liquid polish.
3. Optional: Microfiber Polishing Cloth black
A soft, high-quality microfiber cloth specially made for stone surfaces. It polishes gently and effectively without leaving scratches, ensuring a streak-free, brilliant shine.
4. 10 x Finger Cots
Individual fingertip covers to keep your hands clean and ensure a precise, controlled application of the polish.
5. Test Stone Sample
A small piece of real stone to safely test the polish before applying it to your main surface.
Application Guide
Step 1: Preparation
– Put on the finger cots to protect your hands.
– Test the polish on the included stone sample to ensure the desired effect.
– If the stone is installed together with other materials such as anodized aluminum or TPU, it is recommended to temporarily protect these adjacent areas with masking tape or similar before polishing to avoid accidental contact with the polish.
Step 2: Cleaning (if needed)
– If the surface is dusty or soiled, clean it first using a mild cleaner such as glass cleaner.
– Allow the surface to dry completely before applying polish.
Applying the Liquid Polish
– Shake the bottle well.
– Apply a small amount of the liquid polish evenly and thinly to the stone surface using a soft household cloth.
– Let it absorb for about 1 minute.
– Buff gently with the microfiber cloth in light, circular motions until a consistent shine appears.
– If residue remains, lightly moisten the cloth with water or glass cleaner to remove it.
Applying the Paste-Based Polish
– Use this polish for light scratches or when the surface needs deeper restoration.
– Apply a small amount of gel polish onto the stone surface.
– Using the microfiber cloth, gently rub the polish into the surface with circular motions.
– Allow it to sit briefly (about 1–2 minutes) to penetrate the stone.
– Buff the surface with the microfiber cloth until a smooth, high-gloss finish is achieved.
– If needed, slightly dampen the cloth to remove any excess polish.
Step 5: Long-Lasting Protection
– Repeat polishing regularly—use the liquid polish for routine care and the gel polish for more intensive treatment.
– This maintains protection against scratches, dirt, and moisture while preserving the stone’s deep, natural shine.
Important Note
Avoid contact between polish and non-stone materials (e.g., rubber, plastic, anodized aluminum). If contact occurs, wipe immediately with water.
Temporarily mask off or protect surrounding materials before polishing to prevent accidental contact.
With the Roxxlyn Stone Care Essentials Set, caring for real marble and granite is simple and effective—keeping your stone surfaces radiant, protected, and naturally beautiful for years.
 No products in the cart.